- Introduction
- What is Manual Mode?
- Advantages of Manual Mode
- Greater Control
- Enhanced Accuracy
- Parameters to Control in Manual Mode
- Time Base Settings
- Trigger Settings
- Voltage Scale
- Manual Mode Reference Guide
- Using Manual Mode Effectively
- 1. Start with Basic Settings
- 2. Apply Trigger
- 3. Fine-Tune
- 4. Verify Signal Integrity
- 5. Capture Data
- Conclusion
- Whenever You’re Ready, Here Are 5 Ways We Can Help You
Did you know that while many engineers predominantly use automated features in modern oscilloscopes, the full power of these instruments only unfolds when you master manual mode?
Understanding how to use manual mode allows you to get the most from your device and gather data with unparalleled precision. Dive into this comprehensive guide to discover why manual mode is a tool every electrical engineer should know how to use.
What is Manual Mode?
Manual mode in oscilloscopes refers to the configuration setting where you manually adjust parameters like timescale, voltage range, and triggers. Unlike auto mode, which automates these settings based on incoming signals, manual mode gives you the reins to your oscilloscope's full capabilities.
| Key Takeaway |
|---|
| Manual mode gives you unparalleled control and accuracy in capturing and analyzing signals. Learning how to adjust its settings can greatly improve the accuracy and dependability of your measurements, helping you succeed in any task. |
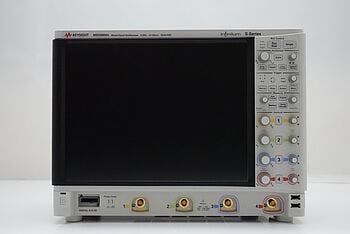
Discover Our Selection of Used Oscilloscopes


Advantages of Manual Mode
Using manual mode on your oscilloscope can greatly improve performance and accuracy of your measurements and analyses. Here's a deeper look at these advantages.
Greater Control
- Fine-tuning: In auto mode, the oscilloscope makes educated guesses to set various parameters like trigger level, time scale, and voltage range. While this is convenient, it doesn't always deliver the best results for specialized applications. Manual mode empowers you to fine-tune these settings. Whether you're dealing with low-level signals or complex waveforms, the control you gain ensures that you capture the details most relevant to your work.
- Customization: Every electrical engineering project comes with its unique set of challenges and requirements. Manual mode allows you to adapt the oscilloscope's settings to meet the specific needs of your task. Are you working on a cutting-edge piece of hardware with unusual signal characteristics? No problem. Customize the oscilloscope settings to see those unique aspects in higher resolution or more significant detail.
Enhanced Accuracy
- Eliminate guesswork: One of the significant pitfalls of using auto mode is the introduction of approximation errors. For example, the automatic trigger level might be slightly off, causing the captured waveform to represent the signal inaccurately. In manual mode, you dictate the precise trigger level, effectively eliminating guesswork and reducing the risk of data corruption or misinterpretation.
- High-resolution data: Manual mode allows you to maximize the oscilloscope's sampling rate and capture finer details of a signal that you might miss otherwise. By manually setting a more extended time scale or reducing the voltage per division, you can achieve high-resolution data capturing. This level of detail is especially beneficial in tasks like signal integrity analysis, where capturing even the smallest anomaly can be critical.
Parameters to Control in Manual Mode
Understanding which parameters you can control is crucial to mastering manual mode. The key parameters you can customize generally fall into three categories: Timebase Settings, Trigger Settings, and Voltage Scale. Here's an in-depth exploration of these elements:
Time Base Settings
The time base settings deal primarily with how the oscilloscope displays time across the horizontal axis.
Horizontal Scale (s/div)
The horizontal scale setting allows you to define the duration of time that each division on the grid represents. Adjusting this parameter enables you to zoom in or out on a waveform to see details or an overarching pattern. Whether you are looking at a fast digital signal or a slow-changing analog waveform, the horizontal scale is your gateway to understanding the temporal aspects of the signal.
Horizontal Position
The horizontal position lets you adjust the zero-time reference point on the screen. This function is particularly useful when you need to align multiple waveforms or observe pre-trigger events. With this control, you can slide the waveform horizontally across the screen to focus on the part of the signal that is most interesting or relevant to your work.
Trigger Settings
Trigger settings dictate when the oscilloscope starts capturing data, ensuring you focus on the essential part of the signal.
Trigger Level
The trigger level parameter sets the specific voltage level that initiates data capture. Setting the trigger level precisely is paramount to capture an accurate representation of the signal, particularly when looking at irregular or rapidly changing waveforms.
Trigger Type
Here, you choose the trigger type, such as edge, pulse, or video. Edge triggering is most common and captures the waveform when the signal crosses the defined voltage level. Pulse triggering is useful when you want to capture signals with certain pulse widths, while video triggering is specialized for analyzing video signals.
Voltage Scale
The voltage scale settings are all about how the oscilloscope displays the signal’s amplitude on the vertical axis.
Vertical Scale (V/div)
The vertical scale parameter lets you define the voltage value each vertical division represents. Like the horizontal scale, this setting allows you to zoom in or out on the signal. A smaller V/div setting will magnify the signal, letting you examine tiny fluctuations, whereas a larger setting gives you a bird's eye view of the signal.
Vertical Position
The vertical position parameter allows you to set the zero-voltage reference point. By shifting the waveform up or down, you can focus on different voltage levels within the signal. This setting is especially useful when you're dealing with signals that have DC offsets or when you want to compare multiple signals that are superimposed on each other.
By fine-tuning these parameters, you gain full control over how the oscilloscope captures and displays data, thereby enabling more accurate and insightful measurements.
Manual Mode Reference Guide
| Category | Parameter | Options & Typical Values | Impact on Measurements |
|---|---|---|---|
| Timebase Settings | Horizontal Scale (s/div) | 1ms, 10ms, 100ms, etc. | Controls time resolution and zoom level of the waveform |
| Horizontal Position | Relative time offset | Sets the zero-time reference point; useful for aligning multiple waveforms. | |
| Trigger Settings | Trigger Level | Voltage value | Determines the voltage level that initiates data capture; critical for signal accuracy |
| Trigger Type | Edge, Pulse, Video, etc. | Defines the type of event that triggers data capture; specialized for different types of signals | |
| Voltage Scale | Vertical Scale (V/div) | 1V, 10V, 100V, etc. | Sets voltage resolution and zoom level of the waveform. |
| Vertical Position | Relative voltage offset | Sets the zero-voltage reference point; useful for focusing on different parts of the signal. |
Using Manual Mode Effectively
Harnessing the full power of manual mode requires not just understanding the parameters you can control but also knowing how to adjust them effectively for different tasks. Here's a step-by-step guide to use manual mode like a pro:
1. Start with Basic Settings
When you first switch to manual mode, it's advisable to begin with basic, broad settings for the timebase and voltage scale. Setting a larger time scale (s/div) and voltage scale (V/div) allows you to capture a wide range of the incoming signal. This broader perspective is crucial for initially understanding the general characteristics of the signal you're analyzing. Once you have this overarching view, you'll be better equipped to make more detailed adjustments later.
2. Apply Trigger
The next step involves applying a trigger, usually starting with the basic edge trigger. This type of trigger is the most straightforward and works well for a wide variety of signals. Start with a reasonable trigger voltage level, typically around the midpoint of the waveform's peak-to-peak voltage. Applying the trigger ensures that your oscilloscope captures a stable and repeating waveform, providing a foundation upon which you can further refine your settings.
3. Fine-Tune
After obtaining a stable, captured waveform with the initial settings, it's time to fine-tune those settings. At this stage, you might zoom in to see the signal details by adjusting the timebase and voltage scale. You may also find it necessary to tweak the trigger level and type to capture specific aspects of the signal more clearly. Fine-tuning allows you to optimize the oscilloscope settings for the best representation of the signal based on your specific needs.
4. Verify Signal Integrity
Before you proceed to capture your data, it’s essential to confirm that the waveform displayed on the screen accurately represents the actual signal. Look out for artifacts, distortions, or noise that might have snuck into your measurements. These unwanted elements often result from incorrect settings, poor probe connections, or external interferences. Verifying the signal integrity is a crucial step that validates your settings and ensures you're measuring what you intend to measure.
5. Capture Data
Once you've verified that your settings are optimized and that the waveform is an accurate representation of the signal, you're all set to capture your data. This final step is where the benefits of all your fine-tuning and verification become apparent. The data you capture in manual mode, enriched by your precise control and adjustments, will be of higher quality and better suited for detailed analysis compared to data captured in auto mode.
In essence, mastering manual mode is a journey that starts with broad strokes and ends with refined details. By following this guide, you will not only understand how to control your oscilloscope better but also enhance the quality and reliability of the data you capture.
Experience the Precision of Keysight Oscilloscopes
Conclusion
Manual mode is more than just an alternative to the automated settings on your oscilloscope; it's a powerful tool that provides greater control, customization, and accuracy. Whether you're dealing with complex waveforms or specialized applications, knowing how to effectively use manual mode can elevate your data capture and analysis skills to a whole new level.
With precise fine-tuning and parameter control, you're no longer limited by the approximations of auto mode—instead, you unlock a world of high-resolution, accurate, and insightful measurements.
Ready to put your manual mode skills to the test with top-of-the-line equipment? The Keysight Used Equipment Store offers premium used oscilloscopes, signal analyzers, waveform generators, and multimeters. All equipment undergoes rigorous testing and calibration to ensure it meets the highest standards. Don't compromise on quality when you can get the best at an unbeatable price. Visit the Keysight Used Equipment Store today to upgrade your lab and take your measurements to the next level.
Whenever You’re Ready, Here Are 5 Ways We Can Help You
- Browse our Premium Used Oscilloscopes.
- Call tech support US: +1 800 829-4444
Press #, then 2. Hours: 7 am – 5 pm MT, Mon– Fri - Talk to our sales support team by clicking the icon (bottom right corner) on every offer page
- Create an account to get price alerts and access to exclusive waitlists.
- Talk to your account manager about your specific needs.