- Introduction
- What is Calibration and Why It's Important
- Does an Oscilloscope Need to Be Calibrated?
- The Calibration Process Step-by-Step
- 1. Examine the Controls
- 2. Turn On the Oscilloscope
- 3. Connect the Probe to the Input Connector
- 4. Touch the Probe to the Oscilloscope's Calibration Terminal
- 5. Adjust the Waveform Display
- 6. Do the Necessary Adjustments for Calibration
- 7. Verify Calibration Accuracy
- 8. Record Calibration Data
- Common Calibration Mistakes to Avoid
- How Often Should You Calibrate Your Oscilloscope
- Oscilloscope Maintenance and Recalibration Schedule
- Advanced Considerations and Best Practices
- When to Use Professional Calibration Services
- Conclusion: Empower Your Measurements with Proper Calibration
- Whenever You’re Ready, Here Are 5 Ways We Can Help You
Have you ever been deep into troubleshooting or analyzing a circuit, trusting your oscilloscope to give you the real picture, only to discover that something's not quite right with the measurements? Maybe the error was small, but it was enough to throw your entire analysis off track.
This scenario is all too familiar for electrical engineers and highlights the critical role oscilloscopes play in diagnosing and understanding electronic systems.
These instruments are vital for capturing and interpreting the electrical signals that tell the story of a device's performance. Yet, the precision and reliability of these measurements heavily depend on one crucial factor: calibration.
What is Calibration and Why It's Important
Calibration, in the context of oscilloscopes, goes beyond simple adjustments or tuning. It's a meticulous process of configuring the oscilloscope's measurements to align with standard values, ensuring that what you measure and interpret from the signals reflects the true performance of the device under test.
Unlike general tuning, which might involve tweaking settings for optimal visualization or performance, calibration involves using known standards to correct any measurement errors, ensuring the oscilloscope reads as accurately as possible.
The importance of oscilloscope calibration cannot be overstated. It is the bedrock upon which reliable, accurate measurements and data interpretation rest. Here's why neglecting this crucial process can be detrimental.
- Ensures accuracy: Calibration adjusts the oscilloscope to maintain measurement accuracy. This is crucial for critical applications where even minor deviations can lead to significant consequences.
- Maintains reliability: Regular calibration ensures the oscilloscope continues to provide reliable data over time, safeguarding against drifts in accuracy due to aging or environmental factors.
- Upholds industry standards: Many sectors require compliance with specific standards for measurement and testing. Calibration ensures your equipment meets these regulatory standards.
- Boosts confidence in measurements: Knowing your oscilloscope is calibrated gives you confidence in your data, supporting your analysis and decisions with solid, dependable measurements.
Consider the impact of calibration on an oscilloscope's performance and the accuracy of its measurements through these examples.
- Signal amplitude: Accurate calibration ensures that the voltage amplitude of a signal is correctly measured, critical for applications where precise voltage levels trigger specific actions.
- Frequency response: Calibration verifies the oscilloscope's ability to accurately measure signal frequencies, essential for analyzing the performance of circuits operating at different frequencies.
- Timing measurements: In digital circuits, accurately measuring time intervals between signals is crucial. Calibration ensures these measurements are precise, supporting correct timing analysis.
- Waveform analysis: For complex signal analysis, such as identifying noise or jitter, calibration ensures the oscilloscope accurately represents waveform characteristics.
Oscilloscope calibration is not just a routine maintenance task. Without it, even the most sophisticated equipment can lead to questionable results, undermining the integrity of your projects and, ultimately, the success of your engineering projects.
Elevate Your Precision with Keysight's Certified Pre-Owned Oscilloscopes


Does an Oscilloscope Need to Be Calibrated?
The short answer is yes, every oscilloscope, regardless of its model, frequency of use, or application area, requires calibration. This process is critical to ensure that the oscilloscope's measurements are within the manufacturer's specified tolerance levels, guaranteeing accuracy and reliability in every reading you take.
A common misconception is that newer digital oscilloscopes, or those used less frequently, don't need calibration as much as their older or analog counterparts. However, this couldn't be further from the truth.
All oscilloscopes, regardless of age or technology, can drift over time due to various factors, including environmental conditions and wear and tear. Therefore, regular calibration is essential to maintain their accuracy.
- Digital Oscilloscopes: These are the most commonly used today and benefit significantly from calibration, ensuring their complex algorithms accurately interpret and display signals.
- Analog Oscilloscopes: While considered less prevalent in modern settings, analog models still require calibration to maintain the precision of their direct signal representations.
- Mixed-Signal Oscilloscopes (MSOs): These oscilloscopes, which combine analog and digital channels, require calibration to ensure both signal types are accurately measured and analyzed.
By adhering to a regular calibration schedule, you uphold the precision and reliability of your instrument, ensuring it continues to perform at its best, regardless of its technology, age, or how frequently it's used.
The Calibration Process Step-by-Step
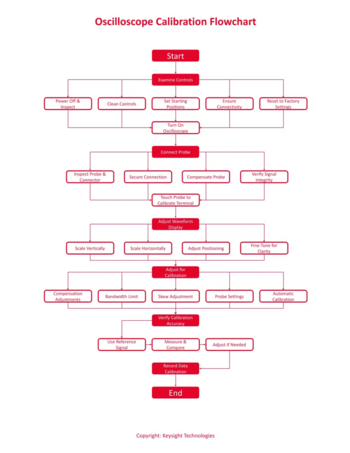
Calibrating an oscilloscope is a meticulous process that requires precision, attention to detail, and a systematic approach. This process ensures that the oscilloscope accurately measures and displays electrical signals, which is crucial for any application where the integrity of data is paramount.
Let's dive into a detailed, step-by-step guide on how to calibrate an oscilloscope, starting with the very first and fundamental step.
1. Examine the Controls
The first step in calibrating an oscilloscope involves a detailed examination of its controls, ensuring everything is properly set up for the calibration process. Here's how to do it:
- Power off and inspect: Start with the oscilloscope powered off to avoid unintended settings changes. Inspect the device for any physical damage that might affect performance.
- Clean and check controls: Clean the controls with a soft, dry cloth to remove dust and debris. This ensures they operate smoothly.
- Set starting positions: Refer to the oscilloscope's manual to set all controls, such as gain, time base, and trigger level, to their default starting positions. This sets a baseline for accurate calibration.
- Ensure connectivity: Check all input and output ports, along with probes and calibration equipment, for good condition and proper connection.
- Reset to factory settings: If necessary, reset the oscilloscope to factory settings to eliminate any residual settings that could interfere with calibration.
This foundational step is crucial for setting the stage for a precise and successful calibration, ensuring your oscilloscope is ready for the detailed adjustments to come.
2. Turn On the Oscilloscope
After ensuring that the oscilloscope's controls are properly examined and set, the next step is to power it on. This step might seem straightforward, but following the correct procedure is essential for a successful calibration.
- Connect to power: Ensure the oscilloscope's power cable is securely connected to both the oscilloscope and a reliable power source.
- Power on: Locate the power button, which is usually found on the front or side of the unit, and turn the oscilloscope on.
- Observe initial checks: Most oscilloscopes perform a series of self-tests upon startup. Watch the display for any error messages or alerts that might indicate a problem.
- Set initial settings: If your oscilloscope does not automatically reset to factory settings upon startup, manually adjust it to a known starting condition as recommended in the user manual. This often involves setting specific modes, adjusting brightness, and ensuring the display is clear and ready for calibration tasks.
- Check for stability: Allow the oscilloscope to run for a few minutes, observing the display to ensure it stabilizes. Any fluctuations should settle as the oscilloscope warms up.
Turning on the oscilloscope correctly and ensuring it is stable and ready for calibration tasks is a crucial step that sets the groundwork for precise adjustments and accurate measurements.
3. Connect the Probe to the Input Connector
Connecting the oscilloscope probe correctly to the input connector is vital for ensuring accurate signal measurement and avoiding potential damage to the oscilloscope:
- Inspect the probe and connector: Before connecting, inspect both the probe connector and the oscilloscope’s input connector for any signs of damage or wear. Clean any debris or dust that might interfere with the connection.
- Secure the connection: Gently but firmly connect the probe to the oscilloscope's input connector. Most probes have a BNC connector that should click or lock into place, indicating a secure connection.
- Compensate the probe: If your probe is switchable (1X, 10X), set it according to the measurement you're making. After connecting, use the oscilloscope's calibration signal to adjust the probe's compensation until the displayed square wave is as close to perfect as possible, with no overshoot or rounding at the corners.
- Verify signal integrity: After connecting and compensating the probe, verify the integrity of the signal on the oscilloscope display. A clean, stable signal without excessive noise or distortion indicates a proper connection.
Correctly connecting the probe to the input connector is a foundational step in the calibration process, ensuring the oscilloscope receives an accurate representation of the signal for precise measurement and analysis.
4. Touch the Probe to the Oscilloscope's Calibration Terminal
Using the oscilloscope's calibration terminal is a crucial step in the calibration process, as it provides a standard, known waveform for calibration purposes:
- Locate the calibration terminal: Find the calibration terminal on your oscilloscope, often labeled "Cal," "Test," or something similar. This terminal is designed to output a standard signal, typically a square wave.
- Connect the probe: Touch the tip of your probe to the calibration terminal. If your probe has a ground clip, attach it to a ground connection on the oscilloscope.
- Observe the signal: Once connected, you should see a waveform appear on the oscilloscope screen. This signal is used for calibrating the oscilloscope's settings, ensuring accurate measurement of real signals.
The calibration terminal provides a reliable, stable signal that you can use to adjust and verify the accuracy of the oscilloscope's settings, crucial for precise measurements.
5. Adjust the Waveform Display
After connecting the probe to the oscilloscope's calibration terminal, the next step is to adjust the displayed waveform so that it is correctly scaled and positioned on the screen.
- Scale vertically (Volts/Div): Adjust the Volts/Div control so that the amplitude of the calibration waveform fits well within the vertical limits of the display, ensuring the waveform is neither too small nor clipped at the top and bottom.
- Scale horizontally (Time/Div): Use the Time/Div control to adjust the horizontal scale so that you can clearly see at least one or two complete cycles of the waveform. This allows for accurate measurement of the waveform's timing characteristics.
- Adjust positioning: Use the vertical and horizontal position controls to center the waveform on the screen. This makes it easier to measure and analyze the waveform's properties.
- Fine-tune for clarity: Adjust the focus and intensity controls, if available, to make the waveform as sharp and clear as possible. This is crucial for identifying fine details in the waveform's shape.
By correctly scaling and positioning the waveform generated by the oscilloscope's calibration terminal, you ensure that the oscilloscope is accurately calibrated, ready for precise measurement and analysis of real signals.
6. Do the Necessary Adjustments for Calibration
Depending on the oscilloscope model and its features, additional adjustments might be required to complete the calibration process:
- Compensation adjustments: If your oscilloscope probe has an adjustable compensation capacitor, fine-tune it using the calibration signal to ensure the displayed square wave is as square as possible, without any overshoot or rounding at the corners.
- Bandwidth limit: Some oscilloscopes allow you to limit the bandwidth. Ensure this setting is appropriate for the signals you plan to measure, which could involve enabling or disabling the bandwidth limit during calibration.
- Skew adjustment: For oscilloscopes with multiple channels, adjust the skew settings to ensure that signals are correctly aligned in time when displayed on different channels.
- Probe settings: Verify that the probe attenuation settings on the oscilloscope match the actual probe you're using (e.g., 10X, 1X), as this affects the accuracy of the measurements.
- Automatic calibration routines: Some advanced oscilloscopes feature automatic calibration routines that can be run from the menu. Follow the on-screen instructions to complete these procedures if available.
These adjustments ensure that the oscilloscope is finely tuned to deliver accurate measurements across a range of signals and applications.
7. Verify Calibration Accuracy
Verifying the accuracy of your oscilloscope's calibration involves comparing its measurements against known reference signals or standards:
- Use a reference signal: Apply a signal with known characteristics (e.g., amplitude, frequency) to the oscilloscope. This could be from an external signal generator or a built-in calibration signal.
- Measure and compare: Use the oscilloscope to measure the reference signal's key parameters. Compare these measurements to the known values of the signal to assess the oscilloscope's accuracy.
- Adjust if necessary: If discrepancies are found, revisit the relevant calibration steps to adjust the settings. This might involve fine-tuning the Volts/Div, Time/Div, or other controls until the measurements align with the reference signal's known values.
Verifying the calibration accuracy against reference signals ensures that the oscilloscope can be trusted for precise and reliable measurements, crucial for any application where data integrity is paramount.
8. Record Calibration Data
Recording calibration data is a critical final step in the oscilloscope calibration process. This documentation is not just a formality; it serves multiple essential purposes.
- Future reference: Detailed records of each calibration, including the date, conditions, adjustments made, and any discrepancies noted, provide a valuable reference for future calibrations. This information can help identify trends or issues with the oscilloscope over time, such as gradual drifts in accuracy or recurring problems.
- Compliance with standards: Many industries require adherence to strict quality and calibration standards. Maintaining accurate records of calibration data ensures compliance with these regulations and standards, which is crucial for audits, certifications, and quality control processes.
- Operational reliability: Calibration records help verify the operational reliability of the oscilloscope. By regularly reviewing these records, you can ensure the instrument remains within its specified performance parameters, supporting the accuracy and reliability of measurements.
- Troubleshooting: Should problems arise with measurements or the oscilloscope's performance, calibration records can be invaluable in troubleshooting. They provide a baseline to determine whether recent changes or drifts may be contributing to the issue.
To effectively record calibration data, include the oscilloscope's model and serial number, the calibration date, the environmental conditions (if relevant), the specific adjustments and settings used, the results of the calibration verification, and any observations or anomalies encountered during the process.
Common Calibration Mistakes to Avoid
Calibrating an oscilloscope is a precise task that requires attention to detail. Understanding these common pitfalls and how to avoid them will ensure a smoother and more effective calibration process.
| Common Mistake | Consequences | How to Avoid |
|---|---|---|
| Skipping Pre-Calibration Steps | Inaccurate calibration due to overlooked issues or incorrect settings. | Always start with a thorough inspection of the oscilloscope and its controls. Ensure it's clean, set to the correct starting positions, and warmed up. |
| Using an Inappropriate Signal for Calibration | Calibration may not be accurate across the scope’s measurement range. | Use a known, stable signal that's appropriate for the oscilloscope’s range, such as the built-in calibration signal or a trusted external signal generator. |
| Ignoring Environmental Conditions | External conditions can affect calibration accuracy, especially for sensitive measurements. | Calibrate in a stable environment. Consider temperature, humidity, and electromagnetic interference and calibrate under conditions similar to where the oscilloscope will be used. |
| Not Compensating the Probe Correctly | Poor signal fidelity, leading to inaccurate measurements. | Carefully adjust the probe compensation until the displayed waveform is accurate. |
| Overlooking Firmware or Software Updates | Missing out on improvements or fixes that affect calibration accuracy. | Regularly check for and install updates to the oscilloscope’s firmware or software to ensure optimal performance. |
| Failing to Document Calibration | Lack of records can complicate compliance and troubleshooting. | Maintain detailed records of each calibration, including dates, adjustments, and any anomalies. |
By being aware of these common mistakes and implementing strategies to avoid them, you can enhance the accuracy and reliability of your oscilloscope calibration process.
How Often Should You Calibrate Your Oscilloscope
The frequency at which you should calibrate your oscilloscope can vary significantly depending on several factors. Understanding these can help you maintain your instrument's accuracy and reliability over time.
Here are the key factors that influence calibration frequency:
- Usage frequency: Oscilloscopes that are used daily or in critical measurements may require more frequent calibration than those used sporadically.
- Operating environment: Harsh environments with significant temperature fluctuations, humidity, or electromagnetic interference can affect an oscilloscope's performance, necessitating more frequent calibration.
- Manufacturer recommendations: Follow the calibration frequency guidelines provided by the oscilloscope's manufacturer, as these are based on the instrument's design and specifications.
- Criticality of measurements: If the oscilloscope is used for applications where precision is crucial, such as in safety-critical systems, more frequent calibration is advisable.
- Previous calibration results: If significant adjustments were needed during the last calibration, it might indicate that more frequent calibration is necessary.
| Oscilloscope Type | Recommended Calibration Frequency |
|---|---|
| Digital | Annually or as recommended by the manufacturer |
| Analog | Every 1-2 years, depending on usage and environment |
| Mixed-Signal | Annually or based on usage intensity and criticality of measurements |
Oscilloscope Maintenance and Recalibration Schedule
Maintaining your oscilloscope and establishing a recalibration schedule is essential for ensuring long-term accuracy and reliability.
Here are concise guidelines to help you create an effective maintenance and recalibration plan tailored to your oscilloscope's operational demands:
- Consult manufacturer guidelines: Start with the manufacturer's maintenance and calibration recommendations as your baseline.
- Assess usage patterns: Increase maintenance and recalibration frequency for oscilloscopes that are in constant use or critical for precision measurements.
- Monitor environmental conditions: In environments with high humidity, temperature fluctuations, or electromagnetic interference, schedule more frequent maintenance checks and recalibration.
- Track calibration history: Use past calibration records to predict future recalibration needs. Frequent adjustments suggest a need for tighter recalibration intervals.
- Incorporate firmware updates: Regularly check for and install oscilloscope firmware updates, which can improve functionality and measurement accuracy.
- Visual inspections: Include routine visual checks for signs of wear, damage, or connection issues as part of your maintenance schedule.
- Functionality tests: Periodically test oscilloscope functions and controls to ensure they operate correctly, adjusting the maintenance schedule based on these findings.
Advanced Considerations and Best Practices
Calibrating an oscilloscope requires not just following a set of steps but also adopting best practices and considerations, especially when dealing with advanced applications and complex signals.
Here are advanced tips and best practices to ensure optimal calibration:
- Handling complex signals: Use appropriate probe accessories to match the signal's characteristics (e.g., high voltage, high frequency). Employ averaging or filtering features to stabilize noisy or complex signals for more accurate calibration.
- Environmental considerations: Perform calibration in a controlled environment to minimize the impact of temperature and humidity fluctuations. Ensure the oscilloscope has reached thermal equilibrium before starting calibration, typically after a warm-up period.
- High-quality calibration standards: Use signal generators and reference standards that exceed the oscilloscope's specifications for the most accurate calibration. Regularly verify the accuracy of calibration sources against certified standards.
- Firmware updates and proactive maintenance: Regularly check for and apply firmware updates to ensure the latest features and fixes are in place.
- Calibration certificates: Obtain and preserve calibration certificates that document the oscilloscope's performance against known standards. Calibration certificates are crucial for traceability, compliance, and in applications where measurement integrity is paramount.
Optimize Your Measurements with Keysight Calibration Services
When to Use Professional Calibration Services
Professional calibration services offer specialized expertise and resources for ensuring your oscilloscope operates within its specified accuracy and meets all relevant standards. Knowing when to use these services is essential for maintaining the precision and reliability of your equipment. It ensures that your oscilloscope performs within its specified accuracy and meets all relevant standards.
Circumstances for Professional Calibration Services
- Complex calibration needs: When dealing with high-precision requirements or complex equipment that exceeds in-house capabilities.
- Certification and compliance: Need for calibration certificates compliant with international standards, like ISO/IEC 17025, which ensures competence and reliability of calibration and testing.
- Lack of in-house resources: When the necessary calibration equipment or expertise is not available in-house.
- Regular maintenance schedule: As part of a regular maintenance schedule, ensuring oscilloscopes are always within specification, especially for critical applications.
In-House vs. External Calibration Services
- Cost-benefit analysis: Professional services can be more cost-effective for complex calibrations, considering the potential cost of acquiring and maintaining the necessary calibration standards and equipment.
- Resource requirements: In-house calibration requires investment in equipment, training, and time. External services eliminate these overheads, offering a turnkey solution.
- Expertise levels: Professional services provide access to experts with specialized knowledge and experience, ensuring calibrations are performed to the highest standards.
Choosing between in-house and external calibration services depends on your specific needs, capabilities, and the criticality of the measurements. Professional calibration services ensure not only accuracy but also compliance, offering peace of mind for operations where precision is paramount.
"For all used equipment, we offer our clients calibration and a 1-year warranty." – Keysight Account Manager
Conclusion: Empower Your Measurements with Proper Calibration
Ensuring your oscilloscope is properly calibrated is crucial for accurate measurements. Regular calibration checks and adjustments guarantee that your data is reliable, supporting sound decisions in your projects and research.
Maintain a proactive stance on calibration, keep up with best practices, and know when to call in experts for precision tasks. This approach keeps your instrument in top condition, ready for the demands of complex analyses.
Accurate calibration underpins every successful measurement. Aim for excellence in every data point you collect. Let each measurement you take be a testament to your commitment to excellence, setting a standard for precision and reliability that inspires others and drives progress.
Whenever You’re Ready, Here Are 5 Ways We Can Help You
- Browse our premium used network analyzers, oscilloscopes, signal analyzers and waveform generators.
- Call tech support US: +1 800 829-4444
Press #, then 2. Hours: 7am – 5pm MT, Mon– Fri - Talk to our sales support team by clicking the icon (bottom right corner) on every offer page
- Create an account to get price alerts and access to exclusive waitlists.
- Talk to your account manager about your specific needs.